Friday, July 17, 2009
Wretched!
Because my family shall be busy falling madly in love with our new one, there will be no new posts until late August. We'll mark our return with a fabulous give-away though! How is that for bribery to ensure you'll stick around?
For now I have something wonderful to share with you. Pia has gorgeous Fairy items for sale in her shop!!!!
I hope you're enjoying your summer session, & that your days are filled with adventure, knowledge, & magic!
~Prof. Kat
Monday, May 18, 2009
Herbology :: Collection Booklet
Our kids keep Herbariums: think Wizardy version of a Nature Journal. Pia tells them what to look for, they choose their plants, & draw what they see in their Herbariums. They then look up information on their chosen plants, & write down what they've learned.
Because neither kid takes their Herbarium & colored pencils wherever they go, they often miss out on fabulous opportunities to study plants that catch their eye.
My first thought was to just keep a few zip-baggies with us, like we do when we go exploring. The more I thought on it though, the more i realized they needed something that would do better at keeping the specimens flat until they were back home. Enter the Herbology Collection Booklet!
For each booklet you'll need:
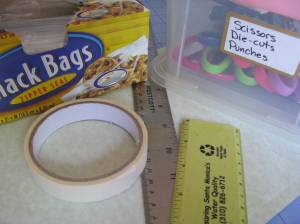
5 snack size zip-baggies * 2 pieces of card stock * masking tape * scissors * ruler * sewing machine
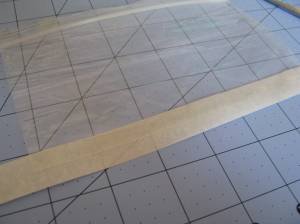
Place the bottom of each zip-baggie halfway onto a strip of masking tape, cut the tape at the end of the baggie, & fold it up, over the other side. This is to give the baggies extra strength. If you want to omit this step, I'm sure you'll be fine. No angry Owls if you choose to skip taping, & havoc ensues.
Fold your card stock in half, place a baggie inside, & measure a minimum of 1/4 inch around the top, bottom, & outer edge. Cut your card stock; with fancy shears if you like. You'll need the other piece cut as well, but you can use the first as your template instead of measuring.
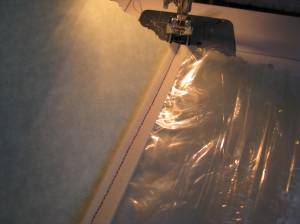
Open one of your pieces of stock, stack your baggies, & place them (tape side in) to the right of your crease. Stitch straight down the center of the masking tape on your sewing machine.
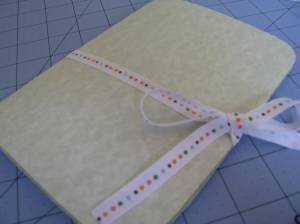
For extra sturdiness, glue your booklet inside your second piece of folded card stock. Again, you can skip this step if you want. Attach ribbon to keep it closed, & head out to the wilderness!
Some notes: Your needle will get gooey, so toss it after you've created your booklets. Use a chip/crisp clip to hold your baggies still whilst sewing them. You can use a decorated piece of cereal box in lieu of the outer piece of stock if you like. If you make your booklet slightly larger on the outer edge, you can affix a sticky velcro tab, & just skip the ribbon. Only pick plants from places it is legal - when in doubt, take a photo instead.
The one pictured is a test booklet. The kids shall be getting official-looking, Hogwartsy Booklets of course - that's the plan at any rate ;-)
If you chose to make Collection Booklets; either for or with your kids; please send us photos!
~ Prof. Kat
Tuesday, April 21, 2009
Herbology Comparisons
We've been seeing a lot of the Muggles' latest way to get along without magic of late. The Topsy Turvey is a hanging bag in which you grow your tomatoes upside down. All of us at HH are fascinated by this invention, but unwilling to pay what they charge to give it a go. Then last night I was chatting with Kell (a Minnesotan Hogwarts Homeschooler) about this very thing, & she informed me that she was planning to make her own! Well if that doesn't have the makings of an Herbology project, I don't know what does.
From researching on the Mugglenet, I've seen many ways people have created their own upside down planters. The one Kell suggested; & the one we'll be using here at HH; is the reusable grocery bag. Of course you should poke around, to find the planter that best suits you & the ages of your students. For instance: Some use plastic buckets that require drilling. If you dig that sort of thing, or have older kids, then you should choose to go that route. I'm lazy, & have extra grocery bags, hence my choice. The bag needs to be the more durable of the reusable ones. Ours came from a Muggle shop called Trader Joe's, is made of a woven plastic, & has strong handles.
We shall plant one tomato plant upside down in the bag, & an identical tomato plant in a pot of the same size. Over the summer we'll compare how the plants are doing, making notes of any differences we see, (Those with gardens could even plant a third in the ground for observation - extra credit!). Your students can compare & track height, health, bugs, disease, size of fruits, number of fruits, taste of fruits, & so on. How does growing upside down affect the plant? The fruit?You get the idea.
What you'll need:
2 tomato plants (same variety, & size) - 1 sturdy, reusable grocery bag - 1 planter of the same size - potting soil - duct tape (optional)
Cut a small x in the bottom of your grocery bag. If you are concerned that over time the x will rip, reinforce it with duct tape. We'll be leaving ours to chance, so omitting that step. Remove your plant from it's pot, & gently poke it through the x. Now I don't think I have to say this, but just in case: You'll be poking the plant out through the x so it faces downward. Next fill the remainder of the bag with soil, water deep, & hang it in the sunshine from its handles.
Plant the other in the pot, & you're all set.
Suggestions: Choose a variety of tomato that does well in a pot. Place your bag & pot in the same area., so the experiment will be more accurate. Water daily. Avoid placing them in a windy spot - tomatoes do not do well in wind. You can also do cucumbers this way, if your kids prefer them to tomatoes - Lemon Cukes are an excellent choice.
To Potterfy: Use Hogwartsy fonts, & parchment when creating your charts for keeping track of things. Send your Owls from Prof. Sprout. Change wording: water to gillywater, tomato plants to non-venomous-fruiting tentacular, & so on.
~Prof. Kat
Sunday, April 5, 2009
Quicky Link
Here.
Scroll down to the category "Medieval/Mythical". There you'll find a few different ones on Dragons, & one on Unicorns.
To be fair to the Muggle world, there are loads of great word searches on this site. I'm only paying attention to the Hogwartsy ones though ;-)
*Read the directions above each word search. These aren't your usual ones!*
~Prof. Kat
Saturday, April 4, 2009
Eggs!
An Herbology lesson we had planned, was to grow grass in eggshells. I was ready to do just that, when I came across these ceramic eggshells! They are meant to be painted, but our kids opted for permanent markers. The eggs came in a dozen, so when they were done with theirs, they decorated the rest to be given away to their friends.
Another change we made to this lesson, was to plant Giant Sunflower seeds instead of grass. They'll have to keep measuring their plants once sprouted, so they can be transplanted to the garden when ready. The plan is to have them keep track of the growth through the summer; starting with a ruler, then a yard stick, then finally switching to measuring tape. If you do this project with the very young students, stick with wheat grass - the seeds sprout within just a few days.
There are many more ways to use eggs in your lessons this Spring. Here are a few ideas to get your brain bubbling:
Dragon Study - Dad Can Do has quite a few Dragon Egg projects. It is a pay-to-use site now, but very worth the annual fee. I've corresponded with the site's owner, & he is charging out of necessity, not greed. He also seems like a very nice man. I signed up for membership, because the projects he comes up with are mind-boggling! Plus he hasn't said as much, but I suspect he's a Wizard.
Potions - Magically remove the shell from an egg. Here is a good how-to; use the raw egg though, it's vastly more Hogwartsy. You can even use their Muggle eggsplanation (haha), & Potterfy it. This site has a few egg-lessons; all look easily Potterfiable.
Care of Magical Creatures - what creatures from Harry's world came from eggs? Now would be the perfect time to study them!
Cooking (whatever name you've come up with) - Get out your cookbooks, & teach the kids to make all your favorite egg dishes! Cooking is so easily Potterfied, & teaches science, & math without even trying. If you dyed as many eggs as we did, you'll probably want to stick with Dragon Egg Salad Sammiches or Bedevilled by Voldemort Eggs.
As we always say - you're only limited by your imagination.
~Prof. Kat
Tuesday, March 17, 2009
Inter-Wizard Relations
Dumbledore can send the initial Owl, explaining that the Ministry would like to improve relations between the two schools, so all Hogwarts students (and Homeschool Charters) shall begin by studying their language - and they ours.
From then on have your lessons come from some Professeur of something or other at Beauxbaton. You can have this fall under Advanced Charms, or simply Lanugages - that's up to you.
If you're just starting out, keep it simple. Start with vocabulary words, and simple sentences that pertain to your everyday life. Things that you and the kids will be saying regularly: bed, door, car, etc - and - put away your toys, i love you, etc.This is a wizarding school, so don't leave out wand, owl, etc.
For families who've been studying a language for some time, it's as simple as having lessons and Owls coming from the other Wizarding school. Though, as, with those new to the study, add wizarding phrases: Has anyone seen my cauldron?, or the ever-useful You probably should not eat that, as I made it in Potions class.
Don't forget to make it fun! Kids just starting out can label everything with little squares of parchment. Seeing the words on the items is a great way to reinforce what was learned. If you're going to write out sentences (in which they'll insert the correct vocabulary word) make it Hogwartsy: Moaning Myrtle lives in the u-bend of the ____. That's vastly more fun than In the bathroom we sit on the ______.
More advanced students need to have fun too! Have them write letters in the other language. Perhaps a letter to Charlie Weasley for advice on rearing dragons, or to Professor Flitwick asking for the charm that enchants spinach into tasting like chocolate? (assuming you know more of the language than your students, don't forget to write back!)
Older kids can write to penpals; either those who are also learning the language, or those from the country in question. Make sure to find penpals from reputable places (to ensure safety), and stick with other HP fans.
Inter-Wizard Relations can carry over into other areas of HH. Teaching Kitchen Potions? They can plan and cook a meal from the other country. Herbology? Plant a French/Spanish/Etc herb garden. As usual, the only limits are your imagination.
We here at HH are just beginning our Inter-Wizard Relations. Our students shall be receiving lessons from a Wizarding school in Spain. Due to still being behind, we were forced to explain what was going on - and of course blamed Errol for Dumbledore's Owl having not yet arrived. Errol does come in handy ;-)
I hope we've given you a few ideas to get you started. Oh! Don't forget to use parchment instead of boring Muggle paper.
~Kat.
Thursday, March 12, 2009
He-who-must-not-be-named is to blame.
Shan's family left our midst due to the changing needs of her children. After a few years studying together, we were sad to see her family drop out, but we do understand.
Pia's plate has become freakishly full. In addition to all the stuff she already managed to cram into her schedule, she is now running the Family Village at this year's Homeschool Expo.
And me? Well I've been busy brewing a little Wizard in my oven. The first few months were fairly rough, leaving me little headspace for planning Hogwarty goodness.
So you can see we weren't being dreadful on purpose!
Happily Pia & I are slowly getting back into the groove. We've gone through the remainder of this session's lessons, replaced the ones Shan would have taught, tweaked things here & there, & even managed to hold a few classes.
Expect more articles, lessons, & ideas to come - barring any stray bludgers of course.
Thank you for being so patient with us.
~Kat
Thursday, January 22, 2009
A Quick Link!
One of the greatest witches of our age - Martha Stewart - posted a wonderful craft that we just had to share with you.
Paper Dragon
If you're studying China, this will fit in perfectly! If not, don't be disappointed, you can still use the craft for Dragon Studies, or COMC.
Add an Owl from the appropriate Professor, a bit of history of the holiday from the library, or internet, & you're good to go. Those of you who own the Dragonology book, don't forget to have your students read about the Asian Lung.
~Kat
